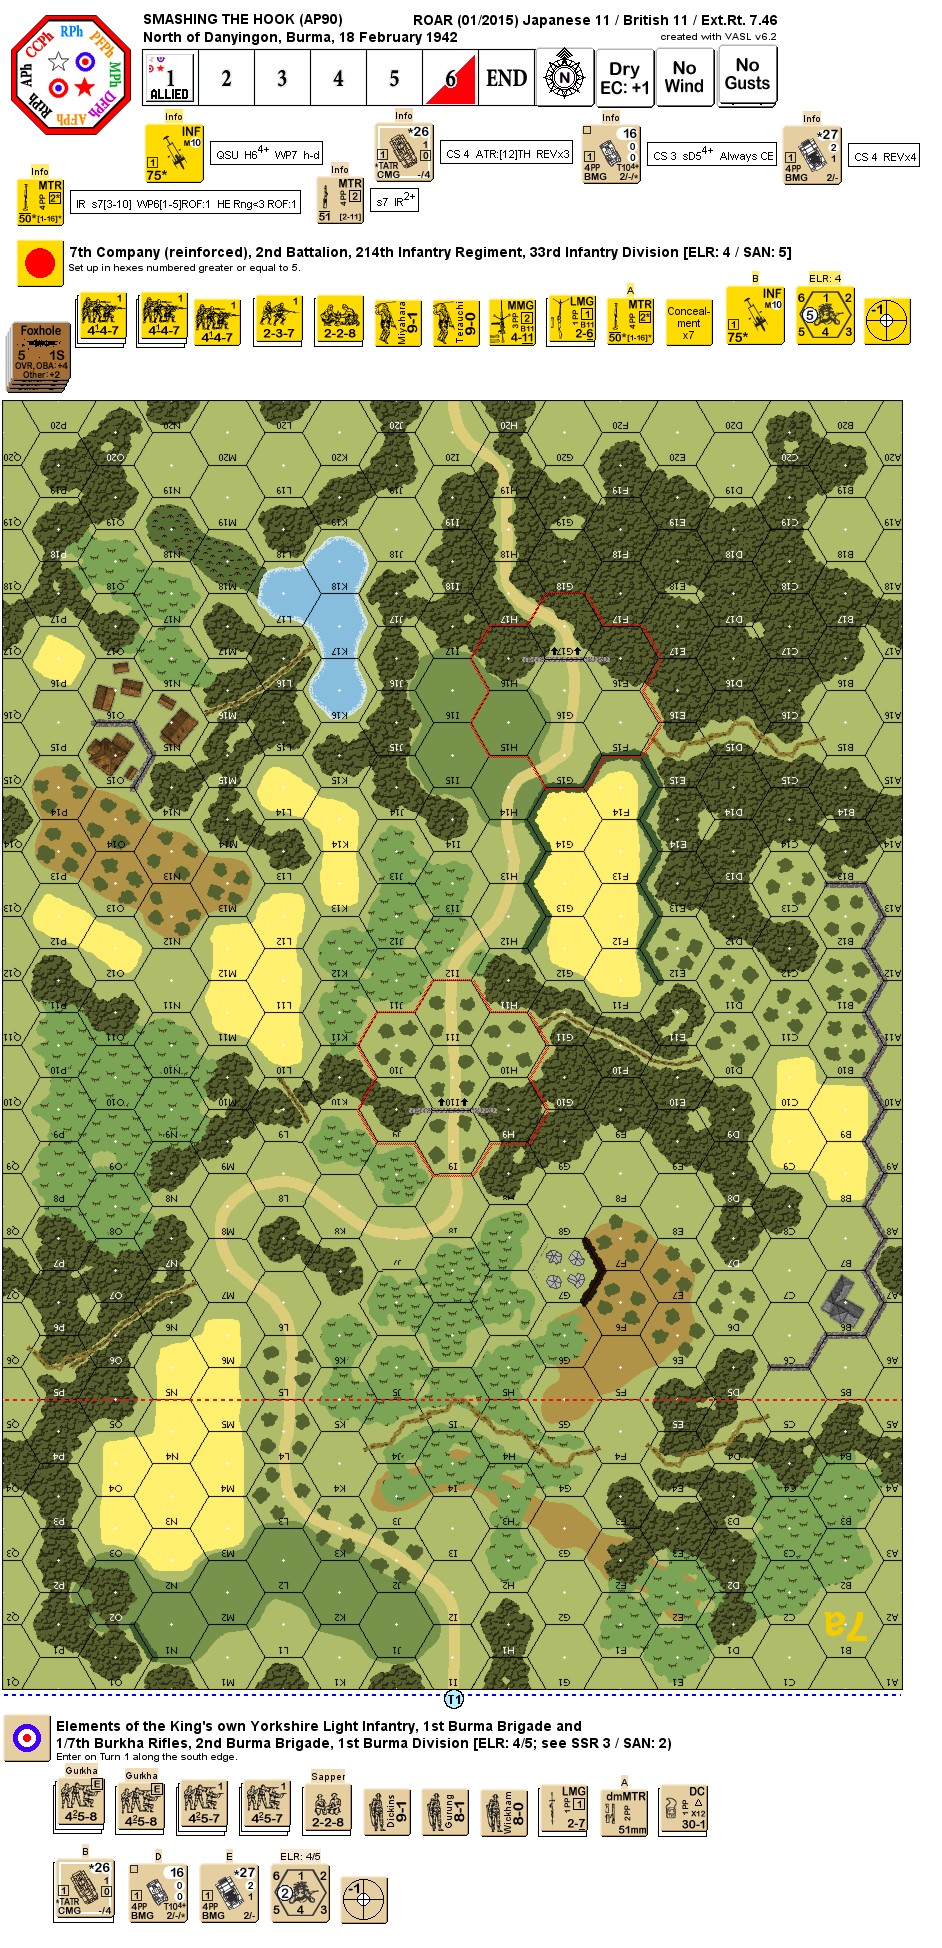
The British were desperate to cover the Salween River crossings; the Japanese were just as anxious to secure them. Aggressive moves by both sides led to a particularly active fight for control of the Yinon crossing. Having beaten back an attack on the two previous days, men of 1/7th Gurkha Rifles were exhausted. Patrols by the King's Own Yorkshire Light Infantry had bumped into several strong enemy positions in and around the village of Danyingon, where attacks on the 17th were repulsed with light losses on both sides. On the 18th the weary Gurkhas and King's Own Yorkshire Light Infantry were sent to clear a roadblock which had been discovered to the north of Danyingon.
Attacker: British (2nd King's Own Yorkshire Light Infantry, 1st Burma Brigade, and 1/7 Gurkha Rifles, 2nd Burma Brigade, 1st Burma Division)
Defender: Japanese (7th Company (reinforced), 2nd Battalion, 214th Infantry Regiment, 33rd Infantry Division)
5.5 turns
Players: 2 OBA: None Night: No
Unit Counts:
Squads: A:11.0 D:9.0
AFVs: A:5
Marmon-Herr. III MFF x 2 Carrier A IP Carrier Mk IIA x 2
AFVs: D:0
Guns: A:0
OML 2-in. Mortar
D:1
Year-41 Type Mountain Gun Type 89 Heavy Grenade-Launcher
In SSR 3, at the end of last sentence, add “and are eligible for the Sapper Clearance DRM (B24.7) when attempting to clear a roadblock (B24.76).ADC Placed/Set by a Sapper receives an extra -1 IFT DRM vs a roadblock (B29.5).”.
J11
Players wanting to play this game/Request a match:
there was an ASO adjustment removing one HS and 4 concealment counters from the Japanese). I attacked aggressively, mostly along the road, using my AFVs to lock the fire of every Japanese that I saw. I took a chance that there was no HIP nearby. I should not have. A moving stack of three squads with leader was hit with a 6 FP attack and everyone broke. My dice that helped everone break, treated me badly for most of the game. They are no longer with me. I reached and cleared the first road block reasonably fast but my units were a somewhat strung out. Oyvind had decent luck destroying bypassing AFV with CC. At the end of the last Japanese turn, I had a small number of units near the second roadblock; so did Oyvind so there was no way I was going to be able to clear them out.
2019-02-27
(A) Michael Rodgers
vs
Magnus
Japanese win
Someone wrote about using riders; they are N/A in 1942. The British need to move fast. Use the AFV to VBM lock any enemy near the road so you can use the road to move fast.
2015-04-18
(A) Paolo Cariolato
vs
Jeff Wasserman
British win
The british absolutely need to get the first roadblock removed ASAP, the third turn is the absolute minimum in order for the AC and carriers to sweep past it, because the timetable is very tight on this one. Riders are a necessity. It's a difficult scenario for the british forces and the inofficial errata provided by the designer is absolutely necessary. Very good scenario btw.
2015-03-16
(A) Eric Partizan Eric
vs
Cyril Guinard
Japanese win
2015-02-16
(A) Eric Partizan Eric
vs
Melvin Falk
Japanese win
2015-01-26
(D) X von Marwitz
vs
Martin Mayers
Japanese win
A British/Gurkha force needs to eliminate two roadblocks or all Japanese GO MMC around them. They are supported by three armored cars, that have truck type MP expenditure and one tracked Carrier. This means, that most of these vehicles will be very slow offroad. And the British don't have much time to lose in this one. Not any time, to be more precise. They can try to flank the Japanese position on either side, so the Japanese should keep that in mind. I played the Japanese defenders in this one. My plan was to fight a fall-back defence while trying not to let my infantry be OVR or VBM freezed, at least not to make that easy. I guarded both flanks with HIP units and deployed my force in a way, that I could quickly reinforce either flank while holding on to the first roadblock for a while. In our game, the British basically has ALL infantry move up the flanks roughly evenly distributed and have only the ACs / Carriers enter in the center. I was lucky that the British stepped into just every trap I had laid AND that I was able to deal some damage. One HIP HS managed to pin a stack, survive retaliatory fire of just about half the British infantry force and then still be a pain in the second British MPh by "being in the way" and placing RFP around. The other HIP HS rolled Snakes when a sneaky Gurkha squad moved in OG next to it ADJACENT. Most importantly, the British was unfortunate enough to advance with both of his Sapper/DC equipped crews into a patch of jungle Bore Sighted by my MTR, in LOS of my INF-Gun pointing the right direction, and my 9-1 led MMG. I killed both during Japanese PFPh Turn 2. This was followed by a 6-1 attack yielding some sort of MC vs. two British 457s, one of which broke, while the other rolled boxcars for fate & ELR. At that point, the Japanese had lost only one of the originally HIP'ed HS in CC while the British had lost 2 Sapper crews with both DCs in Jungle very unpleasantly acquired by Japanese weaponry, 1.5 further squad equivalents and another 2.5 squad equivalents broken. At that point, my opponent conceded, because it was already becoming apparent, that the British would have a very tough job to fulfill the VC in time.
2015-01-10
(A) Raoul Duke
vs
JB
Japanese win
Very tight scenario. I lost because I failed to completely understand some of the subtleties of the VCs. Had a lot of fun though! Also, the first time I've ever had the pleasure of using a Set DC in an ASL game.
2014-11-07
(A) Paul Legg
vs
Nigella Blair
British win
Intensive Fire 2014
2014-07-08
(A) Andy Beaton
vs
Jeff Wasserman
Japanese win
Lost my nerve charging across a road unsupported, and that put me enough behind schedule to lose the game, which is very tight.