Victoria Cross CBI (id:#57606)
(Revision: CH: Rout Pak I RP 9)
Parit Sulong, Malaya
1942-01-20 (6 others)
RP 8: Victoria Cross (Rout Pak I)
RetroPak#12: Victoria Cross (Retro Pak II)
DP BONUS #2: One Last Charge (Digger Pack I)
AP86: Milling About (ASL Action Pack # 9 To the Bridge!)
STL3: It Isn’t Over (China-Burma-India: The Lost Theater Part 1)
STL4: Don’t Count Your Chickens (China-Burma-India: The Lost Theater Part 1)
RetroPak#12: Victoria Cross (Retro Pak II)
DP BONUS #2: One Last Charge (Digger Pack I)
AP86: Milling About (ASL Action Pack # 9 To the Bridge!)
STL3: It Isn’t Over (China-Burma-India: The Lost Theater Part 1)
STL4: Don’t Count Your Chickens (China-Burma-India: The Lost Theater Part 1)
Designer: Glenn Houseman
Starter kit scenario?: Deluxe scenario?:
Balance:
AustralianJapanese
Overview:
A Japanese roadblock has cut the retreat path of an Australian infantry company that is protecting an artillery battery. These mixed elements must clear the roadblock to continue the retreat towards Singapore during the Malayan Campaign. ACTUAL HISTORY: Two below-strength battalions, the 2/29th and 2/19th, a battery from the 2/15th Field Regiment and a depleted Indian contingent, but without any tanks, against a force of more than 10,000 Japanese Imperial Guards and 60 tanks pushing down the Malay peninsula to Singapore. Charles Anderson, a lieutenant-colonel who won the Victoria Cross, ordered his men to withdraw to Parit Sulong, where British forces held the bridge. The men fought with bayonets through road blocks, singing Waltzing Matilda, only to find the British, short of rations and believing themselves cut off, had withdrawn. The Japanese had taken the bridge. After several suicidal, vain attempts to retake it, the Australians were in a hopeless position. Anderson ordered "every man for himself". It was a difficult decision. He had to leave 110 Australian and 35 Indian wounded, hoping the Japanese would care for them or allow the Red Cross to do so. But they were massacred by the Japanese. The wounded were machine-gunned and bayonetted and their bodies set alight.Attacker: Australian (2/19 Bn, 22nd Australian Brigade and the 45th Brigade)
Defender: Japanese (Elements of Kunishi Pursuit Unit (4th Inf. Regiment) Konoe Imperial Guards Division)
7.5 turns
Players: 2 OBA: None Night: No| Unit Counts: |
| Squads: A:14.0 D:7.0 |
| AFVs: A:2 Marmon-Herr. III MFF x 2 Quad FAT x 2 |
| AFVs: D:0 |
| Guns: A:3 OQF 25-Pounder Gun-How. x 2 D:0 OML 3-in. Mortar OML 2-in. Mortar x 2 Boys ATR x 2 Type 89 Heavy Grenade-Launcher x 2 |
| Misc Rules: | PTO, LJ (Exc: East-West Road exists). A: Tr2 and possible Bayonet Charge (human wave) |
| Map Board(s): |
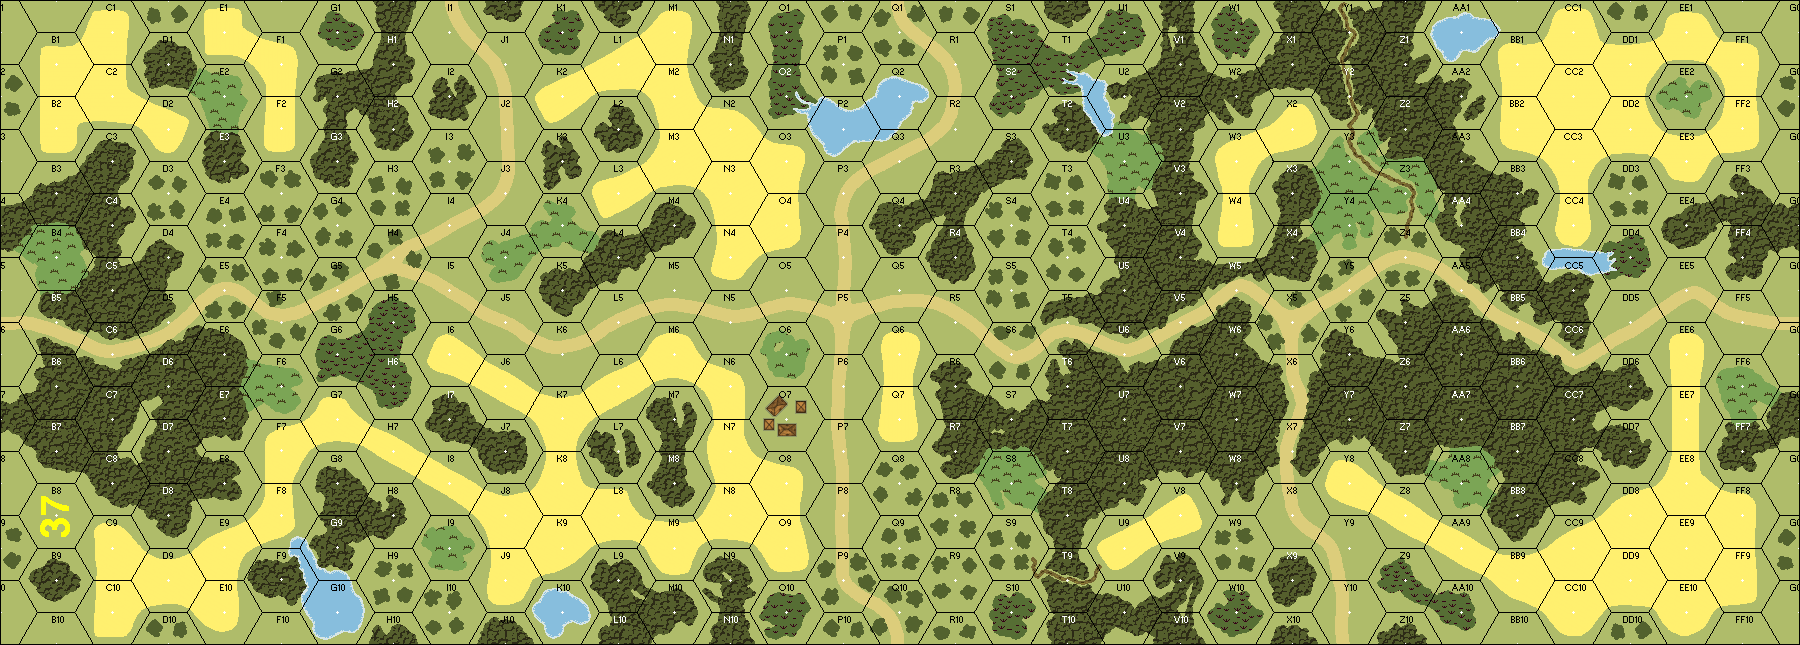
| Overlays: | G2 | Wd1 | Wd2 |
Errata (source)
| SSR3: Change the SSR to read: The Roadblock must set up in hex T5 or S6. A total of one Japanese MMC and any SMC/SW that stack with it may set up HIP (ignore G1.631 HIP), but only less than/equal to 3 hexes from R5. The HMG may boresight. | Rout Report errata |
| SSR3: Change the SSR to read: The Roadblock must set up in hex T5 or S6. A total of one Japanese MMC and any SMC/SW that stack with it may set up HIP (ignore G1.631 HIP), but only less than/equal to 3 hexes from R5. The HMG may boresight. | Rout Report errata |
Players wanting to play this game/Request a match:
Scenario info
Last Played:
View all or balance report
| Action | Date |
|---|---|
| hoxson1 Set the designer field | 2024-02-22 19:17:58 |
| hoxson1 Modified the Attacker's Guns | 2024-02-22 19:09:07 |
| hoxson1 Modified the unit counts | 2024-02-22 19:09:07 |
| hoxson1 Modified the Attacker's Guns | 2024-02-22 19:08:48 |
| hoxson1 Modified the Attacker's Guns | 2024-02-22 19:07:18 |
| File | Description | User | Views |
|---|---|---|---|
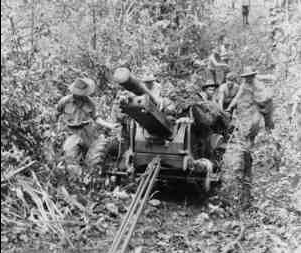
| Aussies position 25-pounder (25 pdr aussies jungle.png) | Image | hoxson1 | 1606 |
| (auss-jap new.png) | Image | hoxson1 | 1584 |
| (vic cross PTO 1 rd.png) | Map Image | hoxson1 | 1606 |
| Description | Uploaded by |
|---|---|
| Japanese Invasion of Malaya | Tomkrny |
| Title | Author | Date |
|---|
| Description | Uploaded by |
|---|
Quick Map View

Location
Not found
Images
Aussies position 25-pounder

| Statistics: | ||
| Avg Rating: 5.00 | Votes: 1 | Views: | 6249 |
| To-Play list count: | 0 | |
| Estimated Play time: | 4.7 hours | |
| Recorded Games: | 2 | |
| Archive recorded plays: | ||
| Australian | 1 | |
| Japanese | 1 | |
| Drawn: | 0 | |
| ROAR Data: (as of today) Victoria Cross [Confirmed] |
| [A] British | 13 |
| [D] Japanese | 21 |