The Lock of Colmar WTO (id:#63879)
Kaysersberg, France
1944-12-18 (20 others)
J88: Escape to Wiltz (ASL Journal # 5)
P: The Road to Wiltz (AH:The General # 26.1)
G29: Shoot-N-Scoot (AH:The General # 30.4)
G41: Jabo! (AH:The General # 31.5)
JR 1: Peiper's Prelude (Internet)
CH 60: Return to Luxembourg (Critical Hit # 3.1)
SP85: The McCown Encounter (Schwerpunkt # 8)
SP86: Bridge at Stavelot (Schwerpunkt # 8)
MP10: Tripwire (Melee Pack II)
JW 01: Deutsche Banzai (German Banzai) (Assurbanipal)
FoW 2: Un Pont Sur l’Amblève (Frog of War Magazine # 2)
FT178: Niederburg Farmhouse (From The Cellar Pack # 7)
192: Shoot-N-Scoot (ASL 3a - Yanks (2nd Edition))
LC-W1: Brushed Back (ASL For Fun-LCP)
DCRB 06: "Who's in Command Here?" (Red Banner 2019 Q3 Summer)
KR#5: Deathtrap For Panzers (Krinkelt-Rocherath)
KR#3: Lausdell Mad Minute (Krinkelt-Rocherath)
FT322: Last Desperate Gamble (From The Cellar Pack #12)
CH 60: Return To Luxembourg (Critical Hit #3.1 2022 Reprint)
ASLN Bonus: The Road To Erpeldange (Critical Hit #8.2)
Designer: Lionel Colin
Starter kit scenario?: Deluxe scenario?:
Balance:
American / Free FrenchGerman
Overview:
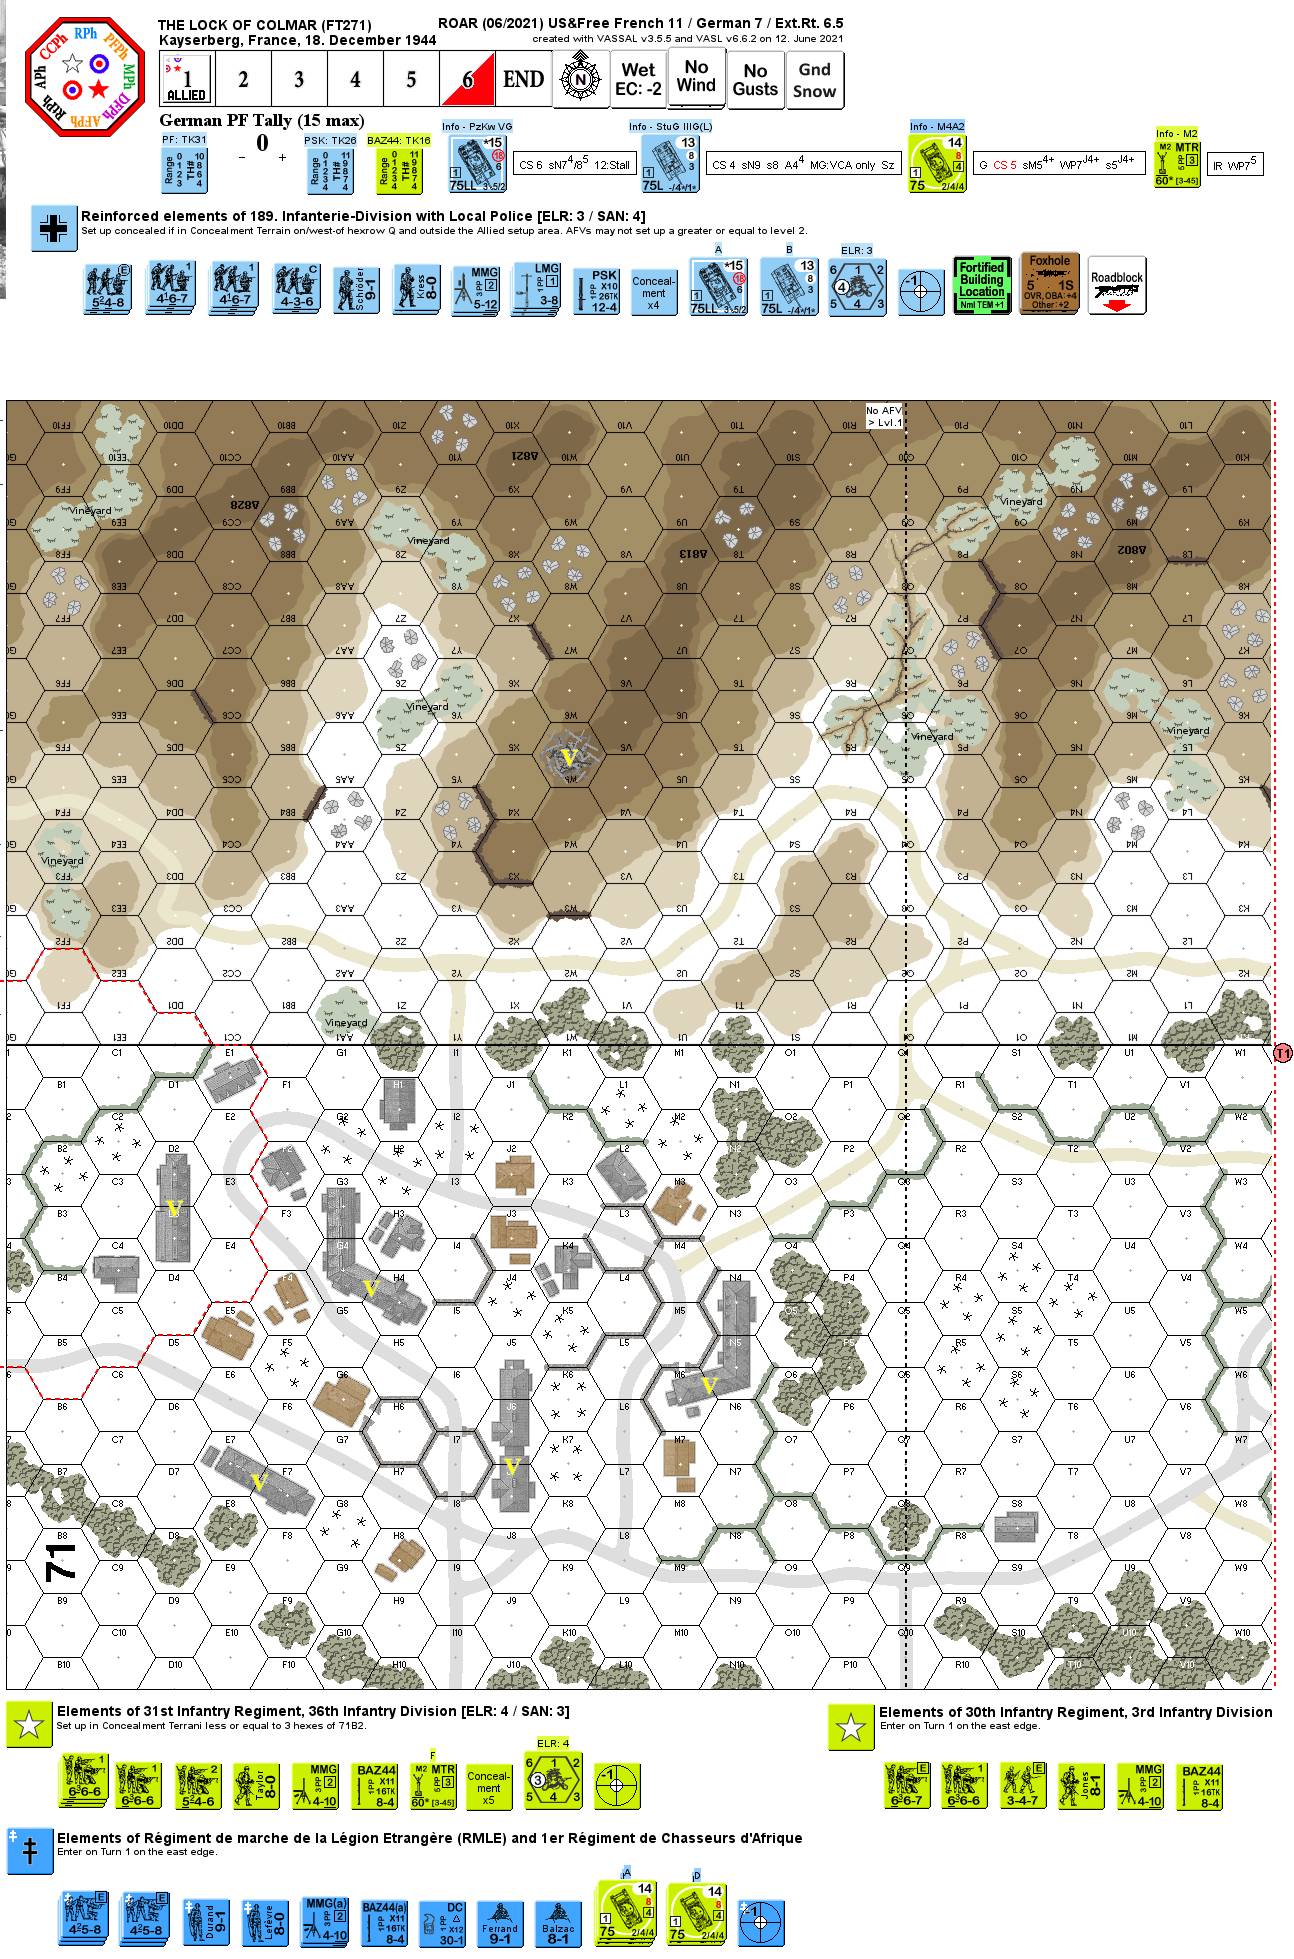
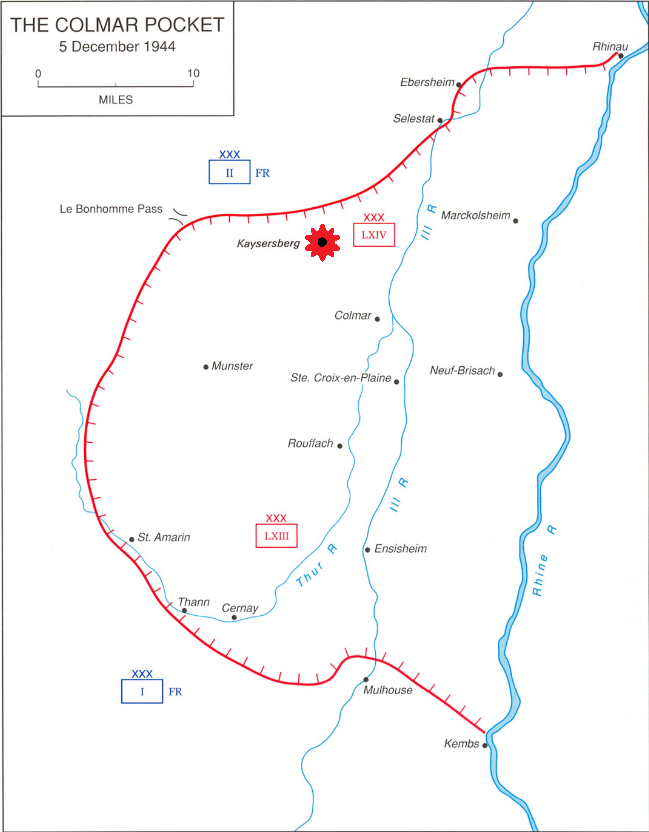
Kaysersberg was a small town situated at the end of the Weiss Valley just before the Alsatian plain in eastern France. At the end of 1944 both sides knew that this town was essential to protect the Colmar Pocket, the last large German foothold in France. The US 36th ID had been blocked and had taken heavy loses while trying to take the town. On the 17th they nevertheless managed to take half of Kayserberg but their AFV support from the Free French 5ème Division Blindée was blocked by the river crossing the middle of the town. They requested help from the 1er Régiment de Chasseurs d’Afrique (5ème DB) and other elements of the 36th ID that have just taken Kientzheim on the northeast. With the support of 25 men from the 30th IR, several elements of the 5ème DB (2 platoons of Foreign Legion and several tanks) launched an attack from behind on the morning of the 18th.Attacker: American / Free French (31st Infantry Regiment, 36th Infantry Division and 30th Infantry Regiment, 3rd Infantry Division with Régiment de Marche de la Légion Etrangère (RMLE) and 1er Régiment de Chasseurs d'Afrique)
Defender: German (Reinforced 189.Infanterie-Division with Local Police)
5.5 turns
Players: 2 OBA: None Night: No| Unit Counts: |
| Squads: A:13.5 D:10.0 |
| AFVs: A:5 M4A2 x 5 |
| AFVs: D:2 PzKpfw VG StuG IIIG (L) |
| Guns: A:0 M2 60mm Mortar D:0 |
| Misc Rules: | GS (E3.72). Brush: Vineyards (B12.7) |
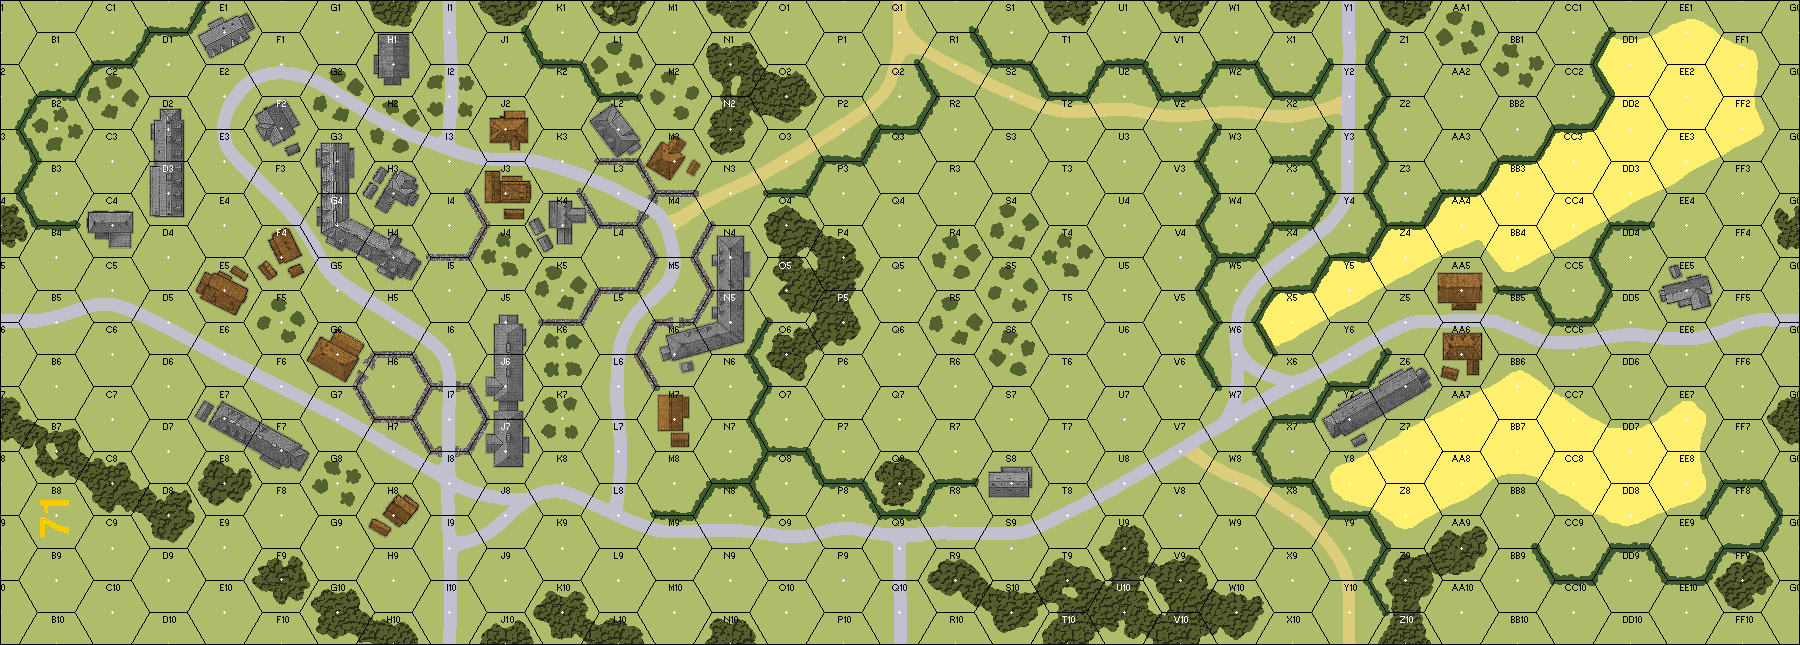
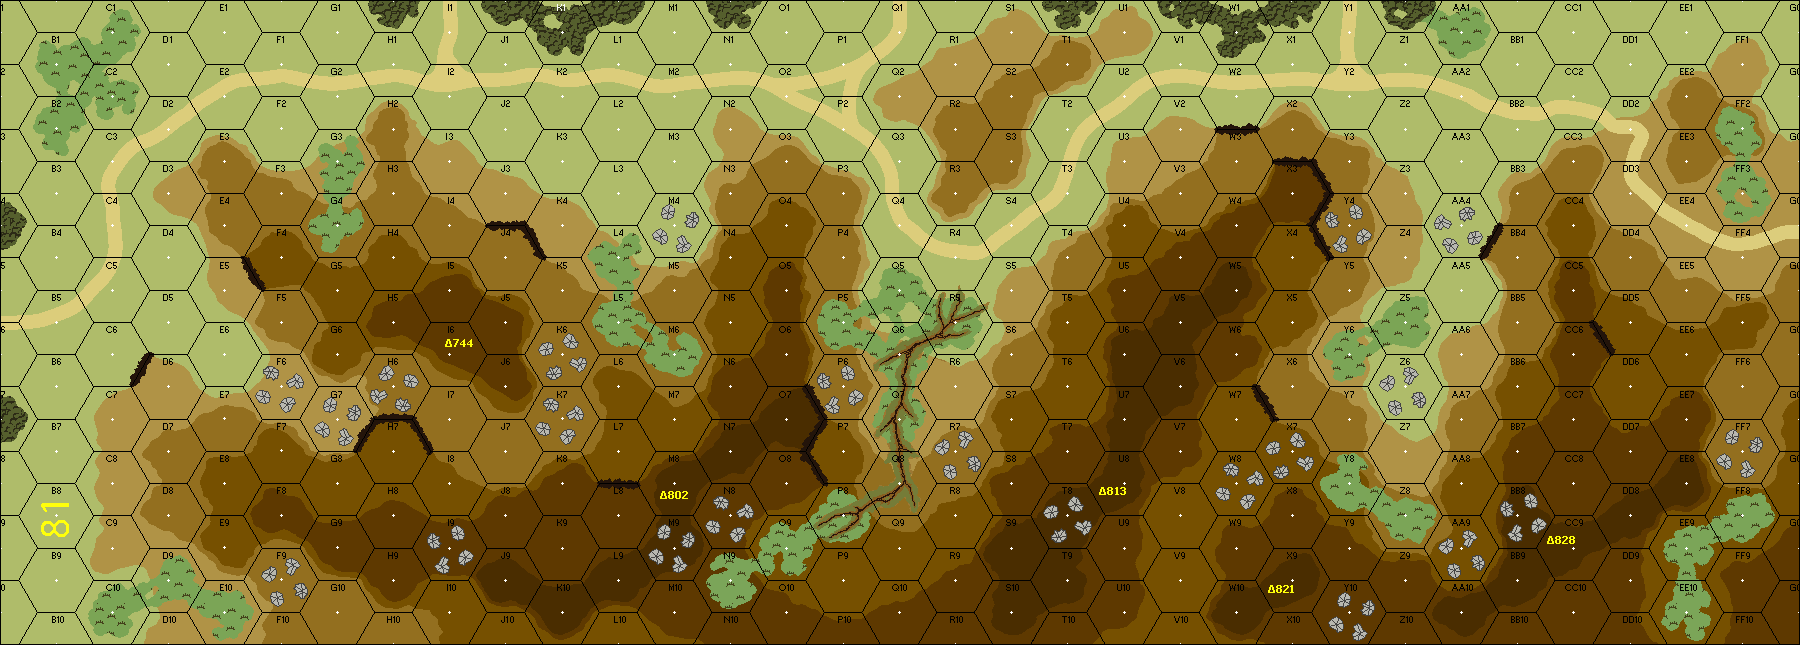
| Map Board(s): |
| Publication | Board |
|---|---|
| ASL 15 - Forgotten War | 81 |
| ASL Action Pack #11 29 Let's Go! | 71 |
| Overlays: | NONE |
Errata (source)
| on board 81 hexrows K-GG are in play | designer |
Players wanting to play this game/Request a match:
Scenario info
Last Played:
| Date | Reporter | Opponent | Bal. | Result | Time | Comments | |
|---|---|---|---|---|---|---|---|
| 2024-08-23 | (A) Dan Best | vs | Kermit Mullins | American / Free French win | 2.42 hrs | ||
| 2024-08-23 | (D) Kermit Mullins | vs | Dan Best | American / Free French win | 2.42 hrs | I enjoyed this scenario and it is challenging for both sides. But it's definitely a bit pro-Allied. My Germans managed to knock out all the Shermans and I still had to concede after I was reduced to 3 unbroken squads in play. This is an infantry fight...and I lost that and thus the scenario. Still enjoyed this one and recommend it. | |
| 2023-11-26 | (A) Will Fleming | vs | Richard King | German win | [Imported from ROAR] | ||
| 2023-02-26 | (A) X von Marwitz | vs | Michael Koch | American / Free French win | Set in December 1944, the Germans try to hold a village (a number of multi-hex buildings and a position on a hill) against a mixed force of Americans and Free French that attack the village from both sides with Ground Snow being in effect. The Germans have 10 squads, mainly 1st line, two Conscript and two 548s, three leaders, a number of MGs, a PSK, a StuG, and a Panther along with some fortifications. The Americans - coming from two sides, have a split force of 5 squad-equivalents, Leader, MMG, BAZ, 60mm MTR and of 2.5 squad-equivalents, Leader, MMG, BAZ. The Free French are actually the Légion Etrangère with 6x 458, two Leaders, 2x MMG, a BAZ, and a DC reinforced by a hefty 5x M4A2 Shermans, two of which have Gyros and for which are two Armor Leaders available. On the flank of the contested village, we find very high and steep hills (bd81) which makes for some interesting terrain. Note, that Vehicles can't cross double Crests unless along a road (of which there are none. EXC: Churchhill tanks - of which there are none either...) The high hills will eliminate many of the otherwise usual blind hexes. Brush is Vinyard and thus Bog Terrain. Game length is 5.5 Turns, so there's no time to be lost. In the West (=left) my plan was to use the MTR to pound the enemy units on the hill (victory location) and later put some WP cover for an eastward push into the village. For the beginning, I was not pushing to keep German units tied up in the west of the village. In the East (=right) of the village, I suspected the Panther the central forward woods (71P5) and the StuG a bit further north (71N1). With this assumption, entering a Sherman in the South would be an invitation of doom, so only one of the offboard tanks was poised to move down there in case the enemy would show his hand early revealing no threat down there. The French would have to push forward with strong Infantry elements through the woods by themselves. In the center, I would move one tank each to 81M1 and 81U1 where both would be safe from suspected enemy AFV and one of my Shermans would be able to pound the German position on the hill. The American infantry would support these tanks, hopefully be eventually capable of crossing the open ground covered by the Shermans and their smoke. Up north, I decided to set up three Shermans. The first one would make a run to 81S10, hopefully getting away with it, because I figured that the enemy StuG would probably have to turn CA in Woods to attempt a shot while the Panther would hold its fire to threaten towards the front. The second Sherman would move to 81O6 attempting HD. The third Sherman would either shift down offboard and then to 81M1 (in the unlikely case that the suspected Panther would turn out to be a Dummy) and otherwise take position in 81L9. The lone Halfsquad was to cautiously move towards the Victory Location of 81W5 after the Germans would be squashed by the Armor. The basic plan was to take out the German hill position as fast as possible, as it had a commanding view across the entire battlefield and could wreak havoc on my infantry almost anywhere unless in good TEM. Four Shermans from the East and the 60mm MTR from the West should see to that. I would hold the Victory Building in US Control in the West at game start, take the hill, the 71E7 building, and the 71N4 building for victory, while containing and ignoring the likely German "Alamo" of 71G3 and the rather inaccessible 71J5. In Turn 1, my initial moves worked as planned. The Sherman in 81O6 did not manage to go Hull Down but was not fired at which reinforced my hunch that the enemy StuG would be lurking in 71N1, avoiding a VCA change. The other two Sherman tanks took their assigned positions in the hills. The French infantry moved through the woods as planned, the Americans in the center as well, while I had the 347+BAZ move offboard to advance into 71W5 with the intention to "reinforce" vs. the suspected Panther. As I did not present any reasonable targets, the Germans could not do much. In Turn 2, I began pounding the German postion on the hill in earnest and I had good rolls including a CH by a Sherman vs. the Foxhole in 81V5. It turned out, that my opponent had posted no less than the German 9-1, 2x 467+MMG up there, which was stronger than I had suspected. Unfortunately for him, all of these broke quickly, which was a very serious setback for the Germans: There is no Rally terrain, and as the Allies are visible from three sides, hardly any place to go at all. For my attackers, this was very fortunate, since I did not have to resort to SMOKEing the hill position to allow for my infantry movement. The Panther moved out from where I had suspected him to take up position in 71N7 - a very powerful position vs. my southern Infantry push and just out of LOS from the tanks in the hills. In the West of the village, there was some little dancing around on both sides but no serious exchanges of fire. At this point, one of the "issues" with the scenario became apparent: The Germans can't do a lot - pressed from all sides, they can mostly only "opt" to stay in place to hold. By the end of Turn 3, the German hill position had been annihilated, with two Shermans dominating the hill from 81V5 and 81U6, now having LOS into the backs of the German positions in the village, which would mean that the Germans would have a hard time regaining Concealment after skulking. My lone HS on the hills had a safe approach towards the VC location. In the central bd71 woods, the Germans defended well, but I was able to reach the open ground next to those woods in force. My worst problem was the menacing Panther in 71N7 which held up my French Infantry all by himself. Luckily, I managed to put down WP in 71O8 next to him firing a Sherman from the hill. One other Sherman in 71O6 reeking of "Gyro&Armor Leader" was in Motion for a flanking threat of the Panther in 71N7. But I had to exhaust the beasts fire opportnities before - this was now made possible by the WP. In there, I moved a 458+DC threatening to Place it from out of the Smoke. The Panther just Pinned it, but used both BMG+CMG while being BU. Next, I rushde a 248+BAZ to 71M8, dodging a shot from 71F8 and being just saved by a corner from the 71M7 outbuilding from more defensive fire. My US 347+BAZ and the Sherman were still able to move at this point. This is when I put the tough decision on my opponent to fire with the Panther's MA on juicy targets of French Infantry pushing from the 71U8 building and 71Q8 woods across open ground towards the central woods or to hold fire to wait. He chose the latter, so my 347+BAZ defiantly moved into the open in 71P6 two hexes away from the Panther, which still held the fire from its Gun. Deciding that prudence is the better part of valor, my Sherman stayed out of LOS of the beast and instead proceeded towards the village along the central road (Roadblock along M4/N3 hexside). It did not serve him well, as it was taken out by the HIP PSK in 71O2 which I had completely forgotten about. Later, the Panther just missed the US HS+BAZ and was in turn missed by its return fire. The French 248+BAZ in 71M8 ADJACENT to the Panther scored a rear hull hit and turned it into a burning wreck thus eliminating the most powerful weapon in the German arsenal and the obstacle to my infantry advance in one fell swoop. So far, the German StuG still had not revealed itself. In Turn 4, I moved two squads in the Western village to 71E5 to engage the lone German squad in the 71E7 building. A French HS had reached 71L10 and was threatening to creep towards the 71J7 building if unchecked. I acquired the suspected "Stug-Hex" from the hill from behind while having all of its exit area to the front except for the initial one covered by another tank. The StuG remained there but could not affect anything from that position. From high up the hill, one of my Shermans landed a low odds hit into the 71M4 building, breaking and ELR'ing a HS in there while a 467+LMG rolled boxcars on its MC. Albeit the Leader in the same location survived unscathed, the German position and this vital building was now seriously compromised: Both broken and DM'ed halfsquads could be kept under DM and from the East, the other German defenders were now outmatched in quantity and quality. With the surviving StuG cornered, the critical eastern Building compromised, two Shermans atop the hill being able to fire into most locations within the village below to suppress the shifting of German forces and not enough Infantry left to hold the Western Building and to reinforce and hold two further ones, my opponent conceded. Inclusive of our playing, ROAR now has it 16:7 in favor of the Free French/Americans. Both my opponent and I agree, that this scenario favors the Allies. There is nothing that the German can do from preventing enemy armor to pound the Hill position into oblivion. The German armor is not allowed to set up higher than Level 1, so it cannot occupy a commanding position. The German cannot afford to just forfeit the Hill position, but it was probably a mistake to man it as strongly as my opponent did. That said, I have been lucky to reduce it as quickly as I did. Assigning 3 tanks to the hills does come at a price for the Allies, as they are fare from the village and the terrain restricts their movement more than one would first think. Yet even so, the high hills provide excellent positions for the tanks to fight at longer range with few blind hexes. The vital game piece for the Germans is their powerful Panther. He can dish out serious damage, but likely, he will be eventually be swarmed by the Allies this way or the other. Gyros & Armor Leaders do boost some of the Shermans. Maybe one should reduce the number of Shermans from 5 to 4 and exchange two German Conscript Squads vs. 1st Line Squads. This scenario does provide an interesting tactical situation. The high and steep hills of bd81 are (still) a rather unfamiliar experience. With the extensive vistas from the hilltops, however, come numerous tedious LOS calculations of blind hexes. Within the village, in theory the Germans could attempt to stomp out the US force setting up on board while leaving only a token force up on the hill. Probably, there is insufficient time for such capers, as this would free the enemy tanks for other tasks besides reducing the hill. In general, my opponent and I agree, that this scenario is more fun to play for the Allies. In many playings, the Germans will find themselves pretty much fixed in the areas where they set up. It is not easy for them to grab the initiative, they rather need to react. von Marwitz | ||
| 2021-03-12 | (A) Chris Anthony | vs | Dave Mareske | German win (VASL Log) |
View all or balance report
| Action | Date |
|---|---|
| Hutch Modified the misc. rules | 2025-09-18 12:33:14 |
| Hutch Modified the unit counts | 2025-09-18 12:32:24 |
| Hutch Modified the Attacker's Guns | 2025-09-18 12:32:24 |
| Hutch Modified the Unit Elements | 2025-09-18 12:29:00 |
| grumblejones Added a playing | 2024-08-24 03:53:02 |
| File | Description | User | Views |
|---|---|---|---|
| (FT271 The Lock Of Colmar v662 no VC no SSR no Pics.vsav) | VASL Setup | von Marwitz | 1668 |
| (usfreefrench-germ.png) | Image | hoxson1 | 1411 |
| (kayser colmar pocket.png) | Image | hoxson1 | 1554 |
| (Setup Tuomo.PNG) | Image | von Marwitz | 1278 |
| VASL Log file (colmar.vlog) | VASL Game Log | Dave | 1842 |
| VASL Log file (The Lock of Colmar.vlog) | VASL Game Log | Eaglewso | 1939 |
| (lock setup tuomo.png) | Map Image | hoxson1 | 1345 |
| (FT271 The Lock Of Colmar v662 Scenario Archive.jpg) | Map Image | von Marwitz | 1343 |
| Description | Uploaded by |
|---|
| Title | Author | Date |
|---|
| Description | Uploaded by |
|---|


