homepage
  • Your recently viewed scenarios
    • Behind in the Count
      grumblejones played the scenario
      Behind in the Count
      Danno played the scenario
      Wasp Sting
      von Garvin played the scenario
      "Lightfoot"
      galletto played the scenario
      Shoot or Shovel
      Bongiovanni played the scenario
      Currie's Favor
      jwert02 played the scenario
  • Not Logged In
  • Home
  • Shop for Scenarios
  • Article List
  • Reviews
  • Advanced Search
  • Game Search
  • Maps
  • Scenario Map
  • Games Wanted
  • Publications
  • Scenario Picker
  • Reports
    • Balance
    • Statistics
  • Contact
  • Events
  • Scenario Lists
  • Information
    • REST API
    • Privacy policy
    • Terms and Conditions
  • Login/Register
    • Login
    • Register
Roff Riders PTO (id:#66500)
(ASL Journal #14 ID: J233)   [next]   [previous]
Babau, West Timor 1942-02-21 (3 others)
A 86: Fighting Sparrow (AH:ASL Annual `95 Winter)
AP91: Parting Shots (ASL Action Pack # 9 To the Bridge!)
J229: Tasmanian Devils (ASL Journal #14)
Designer: Andy Rogers and Simon Spinetti
Starter kit scenario?:    Deluxe scenario?:
 
Balance:
AustralianJapanese
51.851851851852%

Overview:

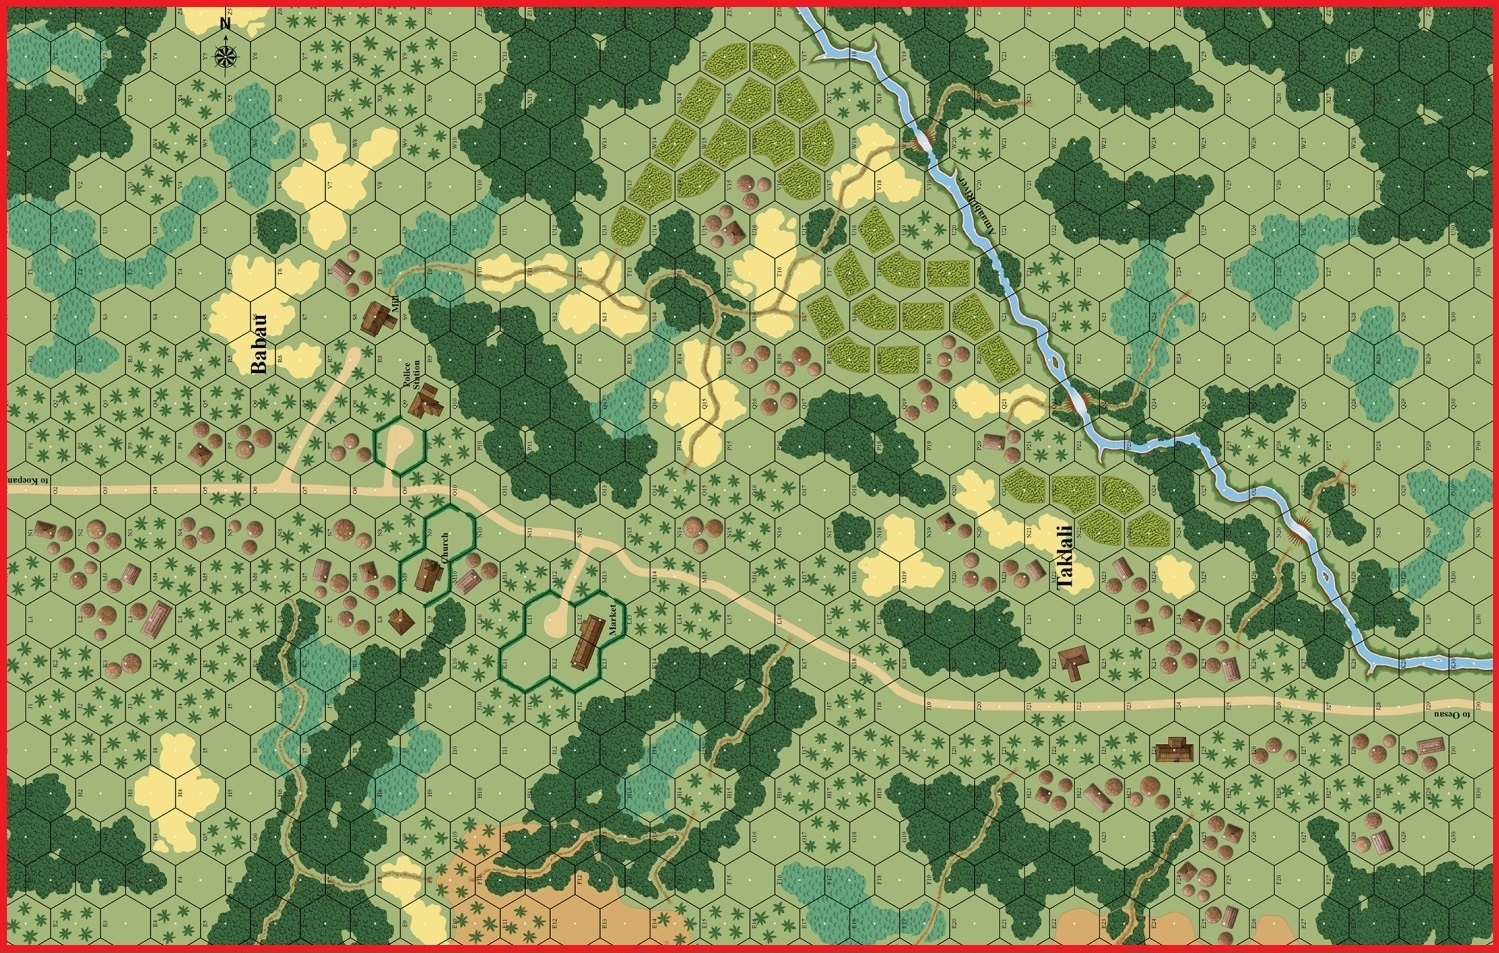
After a day on continuous action and movement in response to the Japanese invasion of Timor, the bulk of Sparrow Force was concentrated at Tarus, 10 miles east of Koepang and 5 miles west of Babau. Between Sparrow Force and its supply head in central Timor were 20 miles of road and a large force of Japanese paratroopers at Babau. The Australians knew they had to clear Babau if Sparrow Force was to remain a cohesive fighting unit. Therefore, at midnight on 20 February, the commander of Sparrow Force ordered two reinforced companies of the 2/40th Battalion to advance the next morning against the Japanese in Babau. At 0530 hours, the companies moved forward but made slow progress due to weariness and the occasional sniper. By 1030 hours, the companies were 900 yards from the village and given a rest until midday. The Australians then moved forward for a third fight over the village with the Japanese.
Attacker: Australian (B Company, 2/40 Battalion, Sparrow Force)
Defender: Japanese (2nd Company and HQ Company, Yokosuka 3rd Special Naval Landing Force, Eastern Detachment)  
5.5 turns
    Players: 2     OBA: None     Night: No
Unit Counts:
Squads: A:20.0 D:17.0
AFVs: A:4
Carrier A x 3
Carrier C

AFVs: D:0
Guns: A:0
OML 2-in. Mortar x 5
D:0
Type 89 Heavy Grenade-Launcher x 4

Victory Conditions:

Exit VP: Building Control VC: Area Control VC:
Unit Based VC: LOS Style VC: CVP Cap:
Misc Rules: See SP SSR
Map Board(s):
MMP: SF Show/hide map dependencies
PublicationBoard
ASL Journal #14MMP: SF
Overlays: NONE
Errata (source)
Players wanting to play this game/Request a match:

Scenario info

  • Recent Playings
  • Latest Updates
  • User Files
  • Public Lists
  • Comments
  • Links/References
Last Played:
DateReporterOpponentBal.ResultTimeComments
2024-11-13(D) Andy Bagley vs Matt Ellis Australian winGreat scenario and a very exciting game. The Aussies concentrated their attack on the village, approaching from the West and South and ignoring the two eastern buildings which I had rushed to defend. Their steady progress was made rather easier by a lone Aussie HS which took the Mill and Police Station almost single-handed, brushing off a hail of defensive fire and overwhelming the numerically superior defenders in CC. The game then came down to the inevitable CC in the market building, and the Aussies only needed to capture one of these locations to win, which they did with a turn to spare.
2024-03-02(D) Michael Rodgers vs Michael Hemmingsen Australian winI thought the turn two Aussies entered on turn one, so I split my Japanese forces incorrectly. After 3 turns of trying to make up for the error, it became obvious the Aussies would have their 5 victory locations near O10.
2024-02-07(A) Stefan Fiedler vs Robert MacGinley Australian win
2024-02-07(D) Rob MacGinley vs Stefan Fiedler Australian winJust for adding comments thsi post - STefan was great to play and his methodical tactics did him proud
The IJA setup spread out and ready for large entry areas - the SSRs of no HIP mean that only concealment gives the surprise
Stefan knew how to limit the IJA - he kept as a large gaggle and thus made it hard to see how either lots of little Banzai attacks or THHs versus those pesky Carriers would not be vapourised by the troops around and went for the clear the village method in strength
Each IJA defensive position was just a speed bump and not much of a challenge - The MGs did dint his carrier force (mad on doing Overruns) as the IJA's only real sucess
The IJA was literally obliterated off the face of the earth (board) one position at a time!
2024-01-17(D) Jeff B vs Steve Etzelmueller Japanese winAussies will be able to storm on unopposed, as this really is not good defensive terrain with all the palms in between. O11 will of course be a prime spot to cut the board in half. As such I figured to just hold out on the front as long as possible, while making the Turn 2 Aussie reinforcements pay a heavy price of entry. So I split my force about evenly between the two. The keys I believe will be how the Aussies use their carriers, as well as how quickly the Jap reinforcements can move up to make an impact. Unfortunately we never really got to that point, as the Aussies suffered a few board-edge breaks that would lead to some FTR, and my opponent (uncharacteristically) failed his PMC early and called it after Turn 2. Thus it's hard for me to gauge this one, but I really thought it was looking to be a close one down to the wire.
View all or balance report
ActionDate
Andy_Bagley Added a playing2024-11-22 17:39:04
peacmyer Rated the scenario2024-06-22 05:07:33
mtrodgers99 Added a playing2024-03-21 01:01:46
macrobosanta Added a playing2024-02-08 17:33:56
macrobosanta Rated the scenario2024-02-08 17:27:03
FileDescriptionUserViews
(auss-jap.png)ImageHutch454
(roff riders map2.jpg)Map Imagehoxson1460
DescriptionUploaded by
TitleAuthorDate
DescriptionUploaded by

Quick Map View

Location

Images

 
Statistics:
Avg Rating: 7.18Votes: 11
Views: 0
To-Play list count: 0
Estimated Play time: 5.6 hours
Recorded Games: 8
Archive recorded plays:
Australian5
Japanese3
Drawn:0

ROAR Data: (as of today)
Roff Riders
[Log in to Confirm or Edit]
[A] Australian 9
[D] Japanese 10
All Rights Reserved. (c)2022 Dave Ramsey.