First, Do No Harm PTO (id:#65862)
Manila, Luzon, Philippines
1945-02-19 (23 others)
HS24: Tickling the Ivories (HSASL 2 - Operation Veritable)
HS25: Lambs Led to Slaughter (HSASL 2 - Operation Veritable)
HS26: Got Milk? (HSASL 2 - Operation Veritable)
OV CG I: Riley's Road CG Milk Factory (HSASL 2 - Operation Veritable)
NEWS69: L'Amour, L'Amour, L'Amour (ASL News # 32)
CH 43: Opening Blow (Critical Hit # 4)
EP69: L'Amour, L'Amour, L'Amour (Euro-Pack III - Late War `44-45)
UV 7: Unfinished Business (Uncommon Valor)
X12: Nowhere to Hide (Rout Report # 2.2)
JF 12: Scheer Terror (Jitter Fire IV)
FrF42: Kiss of Fury (Friendly Fire Pack 5)
GJ038: Croc Night (Grumble Jones)
CH 43(a): Opening Blow (Critical Hit Retro Magazine 3)
HS33: Down on the Farm (ASL Journal #11)
FrF99: Boy Soldiers (Friendly Fire Pack 12)
CtR-14: Dangerous Descent Into Maggot Valley (Corregidor: The Rock)
CtR-15: Night of the Living Dead (Corregidor: The Rock)
YASL 25: Stein's Stinger (Nor'easter Scenario Pack II)
SF08: Meeting at the Elks Club (HASL 11 - Sword & Fire: Manila)
CH 43 Ver. 1.2: Opening Blow (Critical Hit #4 2022 Reprint)
MM84: Mount Belvedere (March Madness 2023 10th Mountain Division Pack)
MM EN: Operation Encore Mini-Campaign (March Madness 2023 10th Mountain Division Pack)
ASLN69: L'Amour, L'Amour, L'Amour (Critical Hit #8.2)
Designer: David Roth
Starter kit scenario?: Deluxe scenario?:
Balance:
AmericanJapanese
Overview:
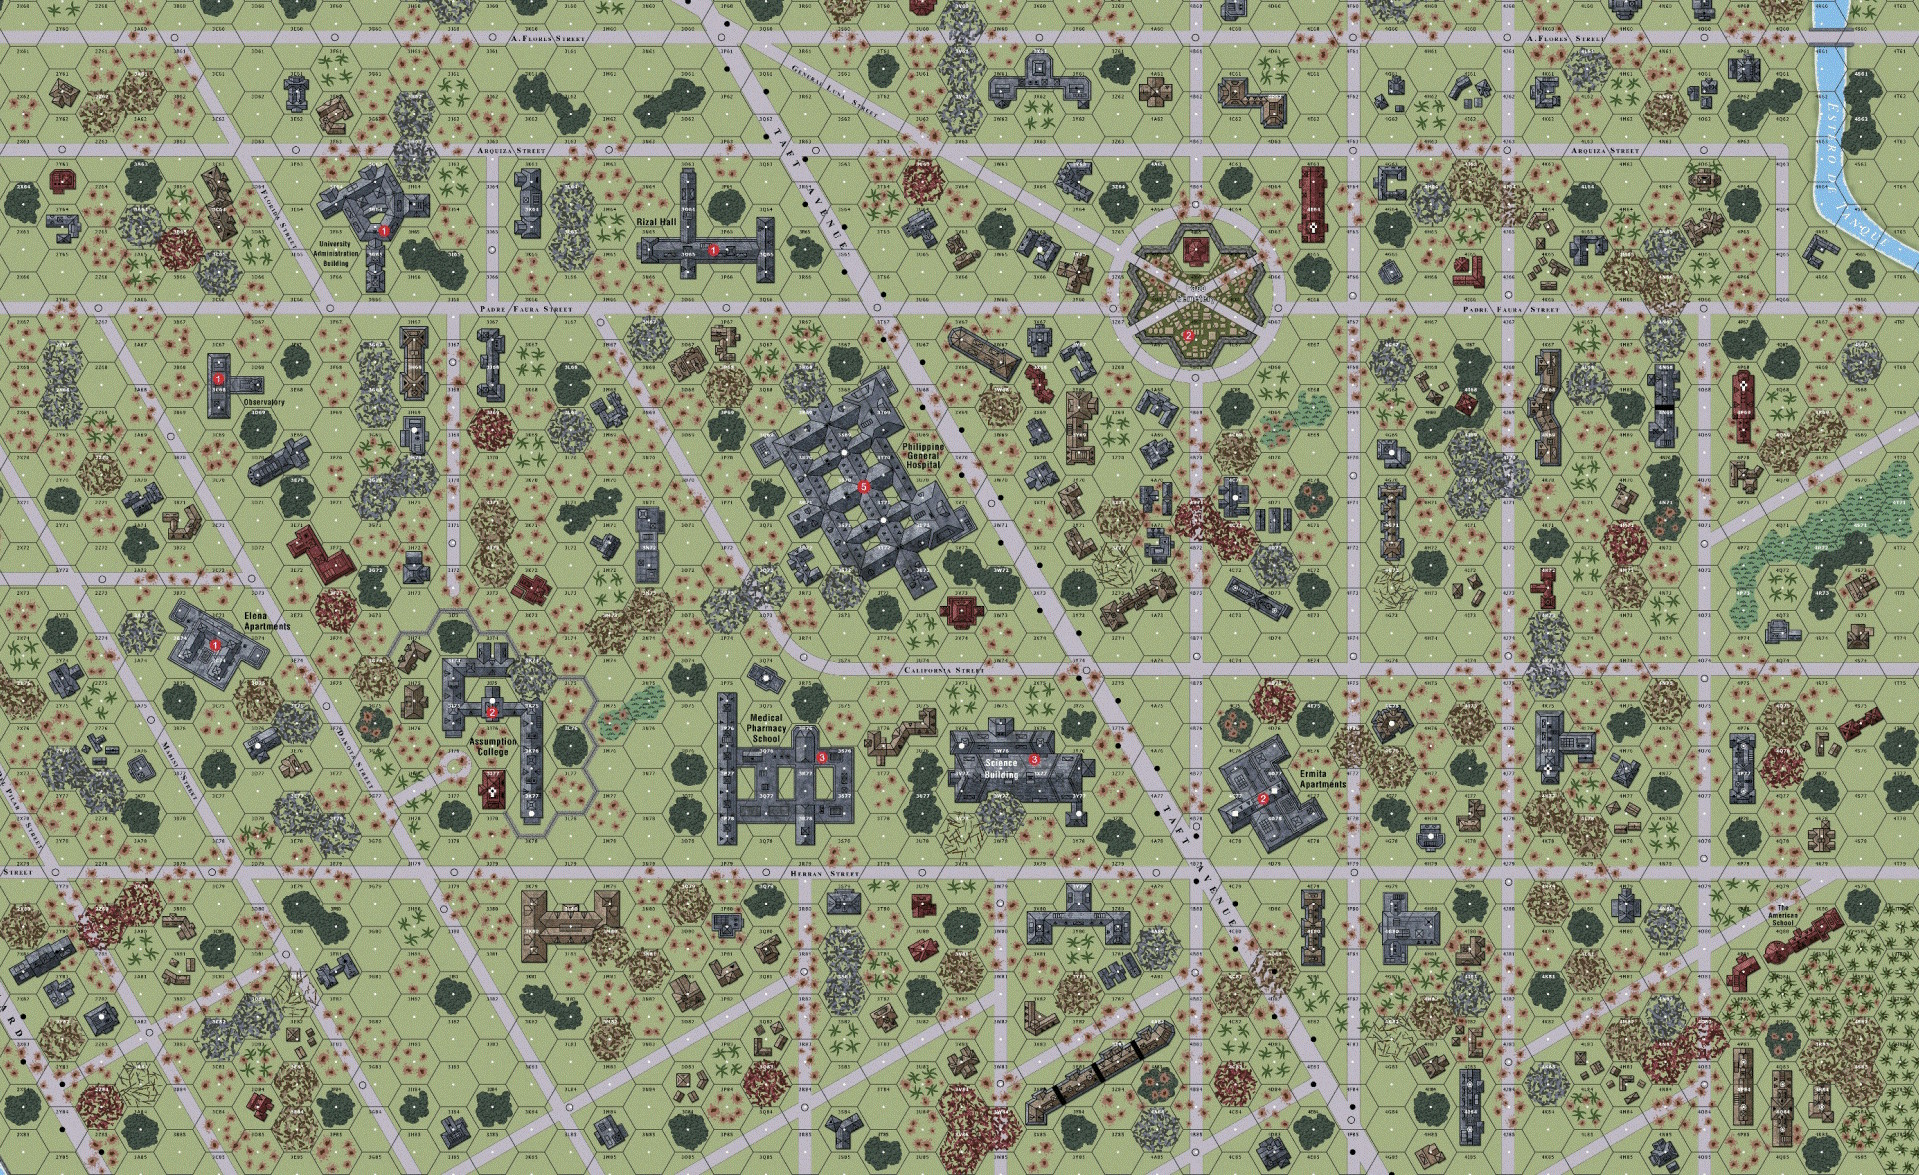
From 16-18 February the 148th Infantry Regiment repeatedly assaulted the Japanese positions in the Medical School and Science Buildings and had penetrated the eastern portion of the University Hospital as well. On the morning of 19 February, the 5th Cavalry Regiment relieved the 148th Infantry from the from lines. Using Tanks, flamethrowers, and bazookas, the troopers finished clearing the Medical School and Assumption College, but the Japanese still held onto parts of the Science building. Turning their attention north towards Rizal Hall, the troopers found it fortified inside and out, with machine guns at every window.Attacker: American (Troops B and G, 5th Cavalry Regiment, 1st Cavalry Division)
Defender: Japanese (Central Force Headquarters Battalion)
8.5 turns
Players: 2 OBA: None Night: No| Unit Counts: |
| Squads: A:22.0 D:20.0 |
| AFVs: A:10 M4A1 x 4 M8 M3A1 ht x 3 M3 ht x 2 2 1/2-Ton x 2 |
| AFVs: D:3 Type 1 HO-KI x 2 M3A1 SC(a) Type 94 Truck x 2 |
| Guns: A:0 M2 60mm Mortar D:5 Type 90 Field Gun Type 98 High-Angle Machine Cannon x 2 Type 92 70mm INF Gun x 2 Type 89 Heavy Grenade-Launcher x 2 |
| Misc Rules: | D: Fortified Buildings (B23.9), A: Civilian Intelligence (SF20.4), M4A1 (Note F) |
| Map Board(s): |
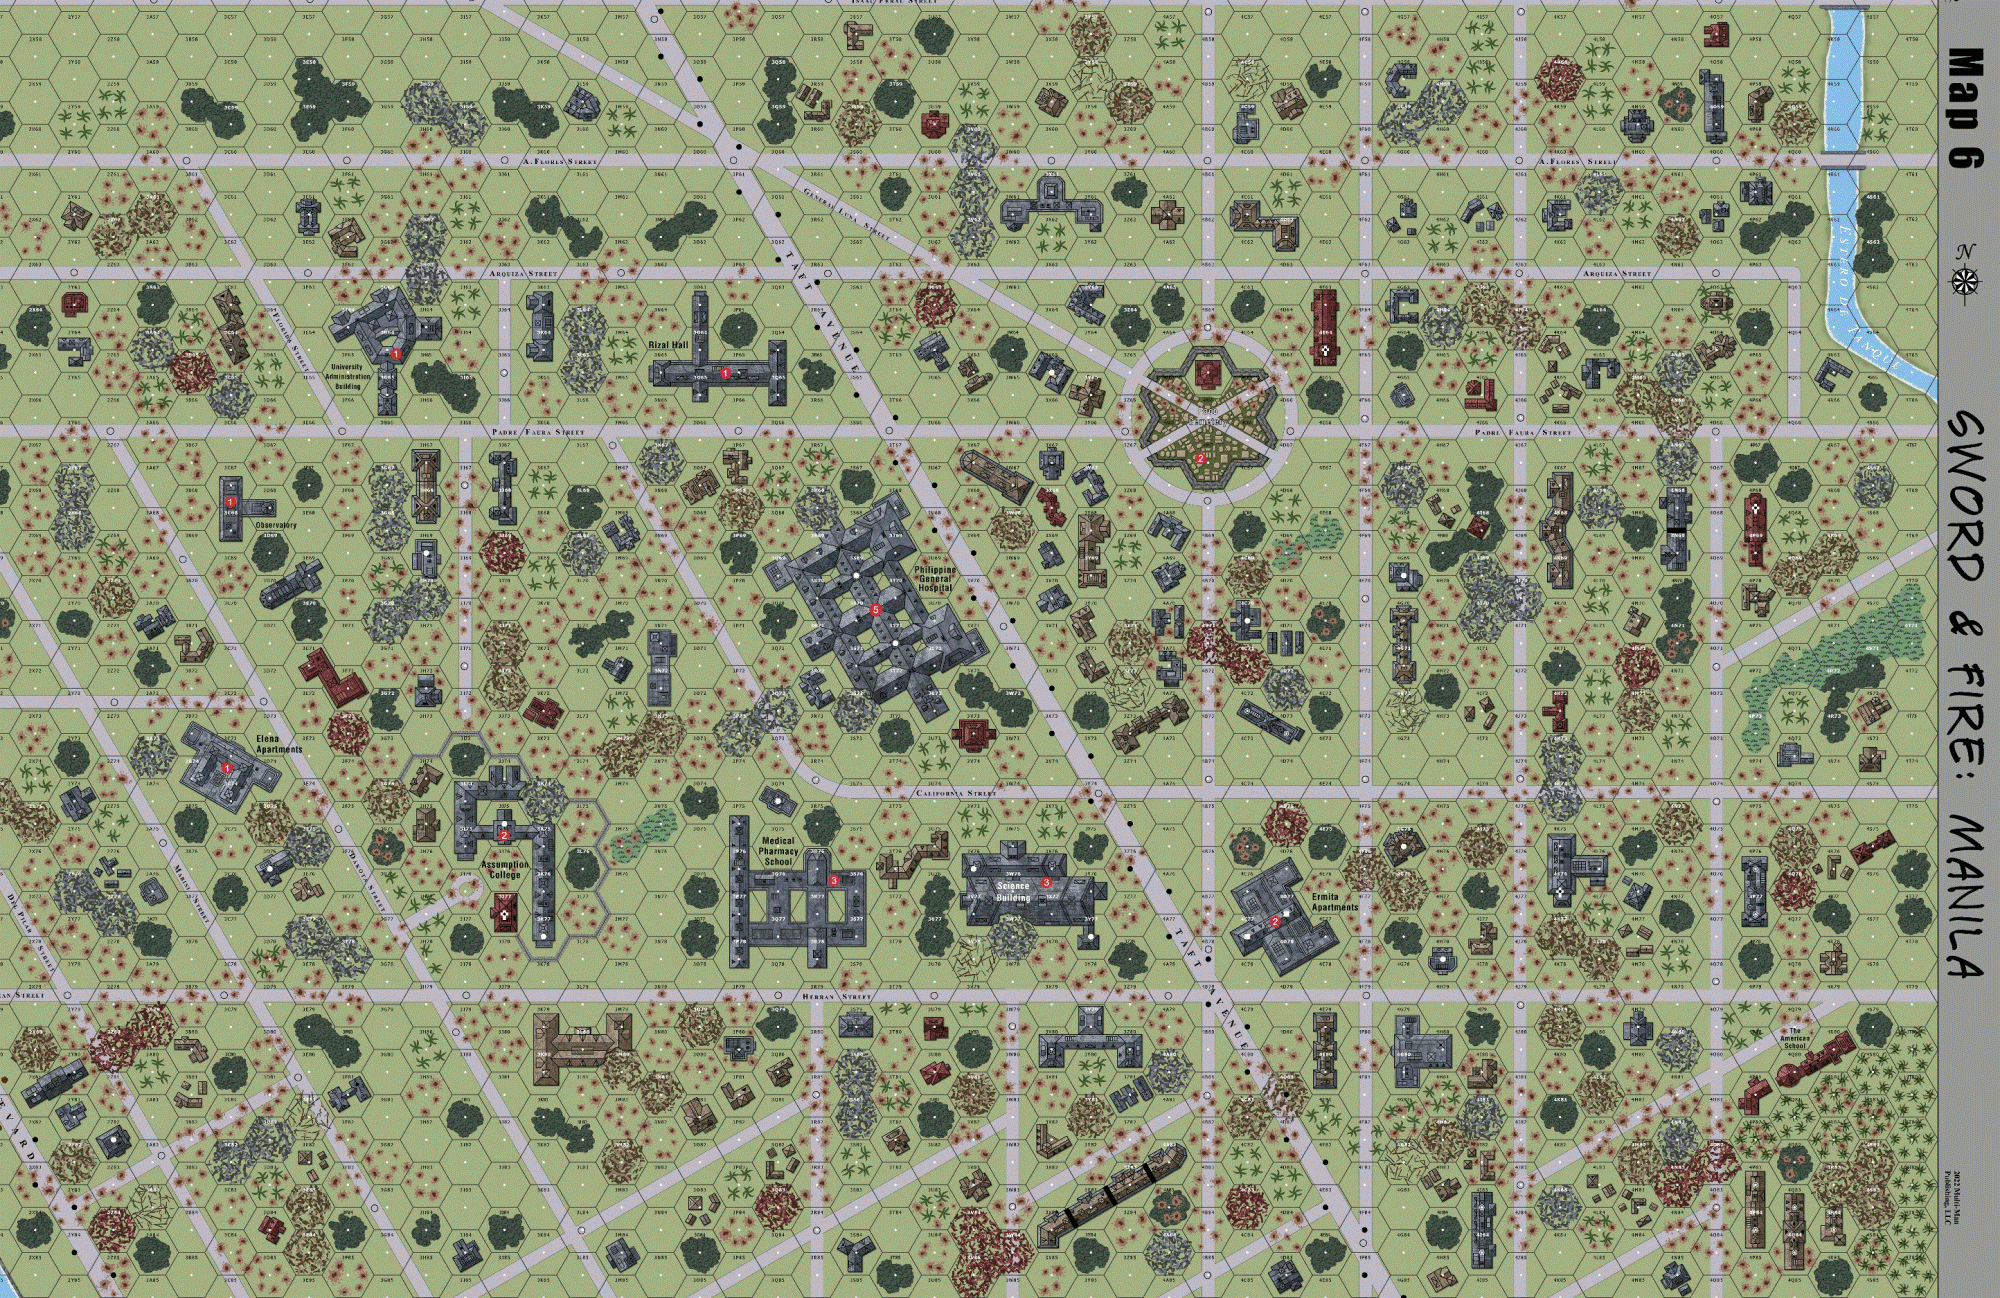
| Overlays: | NONE |
Errata (source)
| In the VC, change “33W77” to “3W77”. | MMP-Perry |
Players wanting to play this game/Request a match:
Scenario info
Last Played:
View all or balance report
| Action | Date |
|---|---|
| aokigaryou Uploaded the Board image | 2025-09-23 23:30:42 |
| aokigaryou Uploaded the Board image | 2025-09-16 07:44:58 |
| Ibncalb Added a playing | 2025-08-19 16:39:02 |
| gekko_66 Linked the scenario to ROAR | 2025-07-24 03:38:51 |
| aokigaryou Modified the unit counts | 2025-07-21 12:18:31 |
| File | Description | User | Views |
|---|---|---|---|
| (!usa-jap.png) | Image | hoxson1 | 1272 |
| (SF9map.jpg) | Map Image | aokigaryou | 527 |
| Description | Uploaded by |
|---|
| Title | Author | Date |
|---|
| Description | Uploaded by |
|---|
Quick Map View
Location
Images

| Statistics: | ||
| Avg Rating: 5.67 | Votes: 3 | Views: | 0 |
| To-Play list count: | 1 | |
| Estimated Play time: | 13.6 hours | |
| Recorded Games: | 3 | |
| Archive recorded plays: | ||
| American | 1 | |
| Japanese | 2 | |
| Drawn: | 0 | |
| ROAR Data: (as of today) First, Do No Harm [Confirmed] |
| [A] Japanese | 4 |
| [D] American | 3 |