White Tigers CBI (id:#61921)
Prior Publication: AH:ASL Annual `92
Ningthoukhong, India
1944-06-07 (63 others)
12: Confusion Reigns (ASL 2 - Paratrooper (2nd Edition))
16: No Better Spot to Die (ASL 2 - Paratrooper (2nd Edition))
27: The Liberation of Tulle (ASL 4 - Partisan!)
103: A Day By the Shore (ASL 5a - For King and Country)
A 47: White Tigers (AH:ASL Annual `92)
A 77: Hide & Seek (AH:ASL Annual `95 Winter)
G22: A Day By the Shore (AH:The General # 29.4)
G42: The Youth's First Blood (AH:The General # 31.6)
S01: Retaking Vierville (ASL Starter Kit #1)
NEWS11: The Port-Filliolet Crossroad (ASL News # 6)
SB 1: You Want to Save Private Ryan? (Internet)
ABS-4: No Better Place To Die... (Airborne Stand!)
AA 4: A Better Spot Than This (All American I: Kellam's Bridge)
AA 14: North Rampart - Fire! (All American II: Timmes' Orchard)
AA 23: Lost Battalions (All American III: Shanley's Hill)
AAGG3: Historical The Port-Filliolet Crossroad (All American: Gamers Guide)
CH148: Trapped at Authie (Reissue) (Critical Hit # 6.4)
CH 1: Authie: The Death of Company C (Critical Hit # 1)
EP11: The Port-Filliolet Crossroad (Euro-Pack III - Late War `44-45)
PdH 5: Rangers Relief (Pointe Du Hoc)
BTB2: Merely Hanging On (Beyond the Beachhead)
O82.1: Armor Leader: Normandy CG (On All Fronts # 82)
PJ7.1: Mines! (OAF Playtester's Journal # 7)
#9: Le Mesnil Strongpoint (To Battle By Air 2)
#4: Dead Man's Corner (To Battle By Air 1)
VB15: One-Man Wrecking Machine (Volfoni Brothers Scenarios)
AP30: Not Apt to Drag Feet (ASL Action Pack # 4 Normandy 1944)
RPT24: Farmyard Affray (Rally Point # 3)
BtB 2: Merely Hanging On (Beyond the Beachhead 2)
SP170: Halfhearted Hiwis (Schwerpunkt #15)
ESG #53: "Mad Mike's" Part Two (Dezign Pak 5)
MLR08: Prelude to Disaster (Elite Canadians)
MLR09: Overrun (Elite Canadians)
BOB # 6: Sink's Orders (BoB - Normandy)
BOB # 7: Tense Moments (BoB - Normandy)
JDJ 1.1: Retaking Vierville (Coastal Fortress)
BAA 7: Tip Of The Spear (The Battle for the Abbaye des Ardennes)
KB II 4: No Better Place to Die... (All American I: Kellam’s Bridge (2nd Ed.))
CH1: Authie: The Death of Company C (Critical Hit Retro Magazine 1)
12: Confusion Reigns (ASL 3a - Yanks (2nd Edition))
16: No Better Spot to Die (ASL 3a - Yanks (2nd Edition))
RPT115: Halfhearted Hiwis (Rally Point #12)
S16-16: Pointmen of Authie (Sweet 16 4-Pack 4)
Round 2: Prelude to Disaster (ANZACon 2005)
27: The Liberation of Tulle (ASL 12 - Armies of Oblivion (2nd Edition))
PEB #1: Along The Way (Port-en-Bessin)
PEB #2: Confused Street Fight (Port-en-Bessin)
PEB #3: Clear Them Out: WN 57 (Port-en-Bessin)
PEB #4: B Troop Arrives (Port-en-Bessin)
PEB #5: Zig Zag 1 (Port-en-Bessin)
PEB #6: DSO Riposte (Port-en-Bessin)
PEB #7: Stutzpunkt Port-en-Bessin (Port-en-Bessin)
PdH #5: Stars and Stripes Forever (Pointe Du Hoc: Retro Bar Gunner Edition)
#8: Raff's Rush (Utah Beach)
159: White Tigers (ASL 13 - Rising Sun (2021))
CH 1: Authie: The Death of Company C (Critical Hit #1 2022 Reprint)
SM10: Not Apt to Drag Feet (HASL 12a - Drop Zone: Sainte-Mère-Église)
SM07: One-Man Wrecking Machine (HASL 12a - Drop Zone: Sainte-Mère-Église)
SM08: Without Thought of Numbers (HASL 12a - Drop Zone: Sainte-Mère-Église)
SM09: Confusion Reigns (HASL 12a - Drop Zone: Sainte-Mère-Église)
SM CG II: Liberation Road (HASL 12a - Drop Zone: Sainte-Mère-Église)
ASLN11: The Port-Filliolet Crossroad (Critical Hit #8.1)
FT75: Unexpected Fire (From The Cellar Pack #13)
Designer: Pat Jonke
Starter kit scenario?: Deluxe scenario?:
Balance:
JapaneseGurkha (British)
Overview:
In early March, the Japanese 15th Army launched Operation U-GO to capture the highland town of Imphal, a vital British base in Assam. As part of the offensive, Lt.-General Yanagida’s veteran 33rd Infantry Division, known as the “White Tigers”, attacked north along the Tiddim Road. By mid-April its advance had ground to a halt about twenty miles from Imphal, where for the next few weeks it exchanged blows with the 17th Indian Division over possession of several villages along the road. One of these, Ningthoukhong, changed hands twice as both sides committed armor over ground now saturated by the breaking monsoon rains. On June 7th, the Japanese threw the last of their tanks into the battle for the village.Attacker: Japanese (33rd Infantry Division and 14th Tank Regiment)
Defender: Gurkha (British) (1/7th Gurkha Rifles and 1/7th Gurkha Reinforcements)
10 turns
Players: 2 OBA: None Night: No| Unit Counts: |
| Squads: A:21.0 D:20.0 |
| AFVs: A:5 Type 97A CHI-HA x 5 |
| AFVs: D:0 |
| Guns: A:0 Type 89 Heavy Grenade-Launcher x 4 D:2 OQF 2-Pounder x 2 OML 2-in. Mortar x 2 |
| Misc Rules: | PTO (G.1), DJ (G2.2). Mud (E3.6), Rain (E3.51), Rubbled Bldgs. (B24) |
| Map Board(s): |
| Overlays: | 3 | 5 | O2 | O5 | X6 |
Errata (source)
Players wanting to play this game/Request a match:
Scenario info
Last Played:
View all or balance report
| Action | Date |
|---|---|
| Yllanes Added a playing | 2025-08-11 21:50:51 |
| Hutch Modified the misc. rules | 2024-10-08 10:46:43 |
| Hutch Modified the gps location | 2024-10-08 10:42:32 |
| Hutch Modified the gps location | 2024-10-08 10:41:20 |
| Hutch Modified the misc. rules | 2024-10-08 10:39:11 |
| File | Description | User | Views |
|---|---|---|---|
| VASL 6.0.3, 2014-03-29, Map Setup (White Tigers.vsav) | VASL Setup | hipsu | 2542 |
| (jap-gurkha.png) | Image | hoxson1 | 1821 |
| 14th Tank Regiment's Shinhoto Chi-Ha captured near Imphal (chi-ha india.png) | Image | hoxson1 | 1945 |
| (White Tigers.png) | Map Image | hipsu | 2055 |
| Description | Uploaded by |
|---|
| Title | Author | Date |
|---|
| Description | Uploaded by |
|---|
Quick Map View

Location
Images
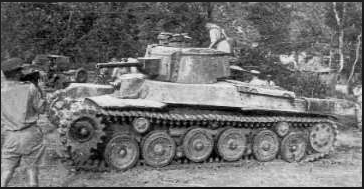
14th Tank Regiment's Shinhoto Chi-Ha captured near Imphal

| Statistics: | ||
| Avg Rating: 7.41 | Votes: 17 | Views: | 9089 |
| To-Play list count: | 4 | |
| Estimated Play time: | 11.9 hours | |
| Recorded Games: | 9 | |
| Archive recorded plays: | ||
| Japanese | 5 | |
| Gurkha (British) | 4 | |
| Drawn: | 0 | |
| ROAR Data: (as of today) White Tigers [Confirmed] |
| [A] Japanese | 9 |
| [D] Gurkha | 9 |